Building a Low-Cost PM$_{2.5}$ Monitor
This tutorial was reconstructed from the old b-io.info multi-page guide. It consolidates the original five pages into one reference page and keeps the hardware/software links intact.
What this build does
This project builds a portable PM$_{2.5}$ monitor for roughly USD 30-40 using a low-cost laser particle sensor, an ESP8266-class microcontroller, and either an OLED display or an LED indicator. The base device shows live concentration locally. The extended version publishes readings to an MQTT broker for logging and later analysis.
Why PM$_{2.5}$ is worth measuring
PM$_{2.5}$ refers to fine airborne particles with diameter up to 2.5 micrometers. These particles stay suspended for hours to days, penetrate deep into the lungs, and are relevant not only outdoors but also indoors during cooking, smoking, soldering, and other combustion-related activities.
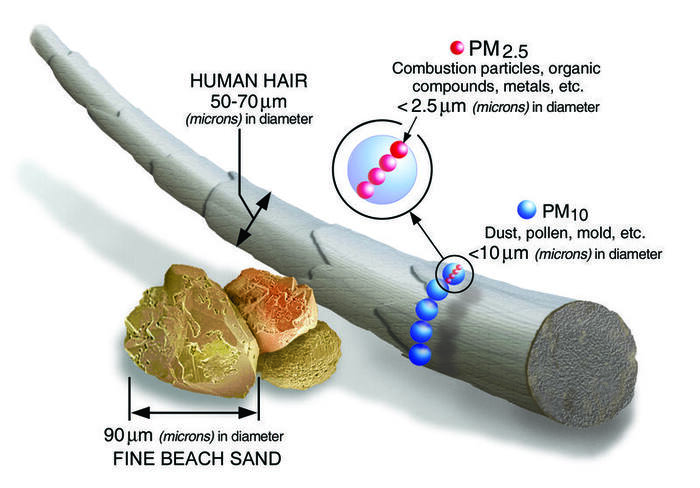 PM$_{2.5}$ is small enough to reach the deep lung. Image reused from the site AQI guide.
The original tutorial frames this as a practical maker project: if you build electronics, live in a polluted city, or want to compare indoor vs outdoor air, a simple PM monitor is useful even if it is not a regulatory instrument.
Measurement method
Reference-grade PM$_{2.5}$ monitoring typically uses gravimetric or beta attenuation methods. Low-cost hobby sensors instead use optical light scattering: a laser illuminates particles in an air stream, and scattered light is converted into particle counts and estimated mass concentration.
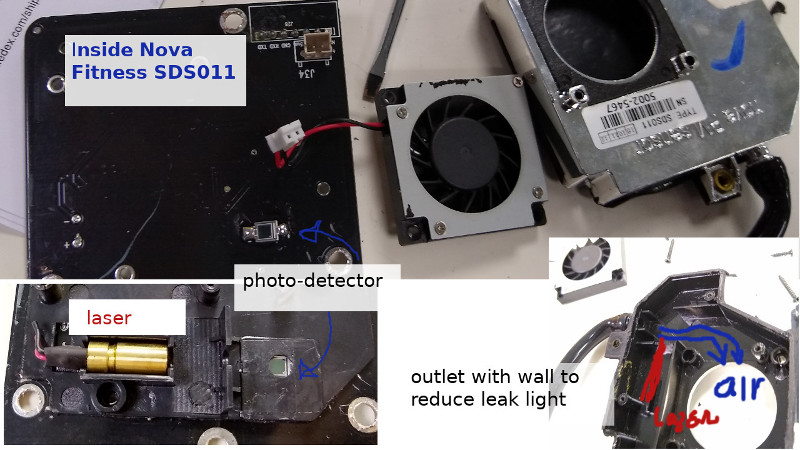 Nova Fitness SDS011, a common hobby sensor with active airflow.
The tradeoff is straightforward:
- low-cost sensors are affordable and responsive
- their absolute accuracy is limited
- they are still useful for trend tracking, relative comparison, and DIY monitoring
Recommended hardware
Dust sensor options
| Sensor | Notes | Typical cost |
|---|---|---|
| PMS5003 / PMS7003 | Compact, quiet, common in hobby projects | ~USD 15-17 |
| SDS011 | Larger, stronger fan, easy to work with | ~USD 15-17 |
| SPS30 | Better brand/documentation, more expensive | ~USD 30 |
| ZH03B | Similar class to PMS5003 | ~USD 20 |
The archived guide explicitly discourages some cheaper or less reliable options:
- very cheap LED-based dust sensors tend to be unstable
- some Alphasense units were inconsistent between devices
- the author had poor field reliability with several Honeywell HPMA units bought from AliExpress
Controller and power
| Part | Role |
|---|---|
| ESP8266 / ESP32 | Main controller, Wi-Fi, display updates |
| OLED 128x32 | Concentration, time, battery display |
| Li-ion cell | Portable power |
| Charger/protection board | Battery charging and safety |
| 5V boost converter | Required for PMS7003 in this build |
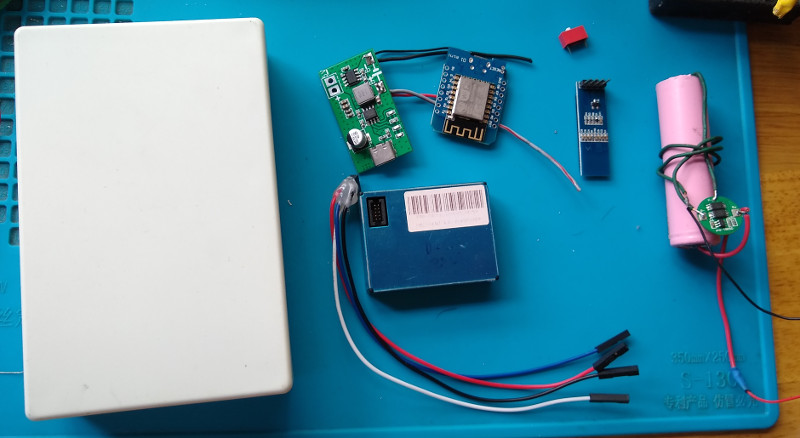
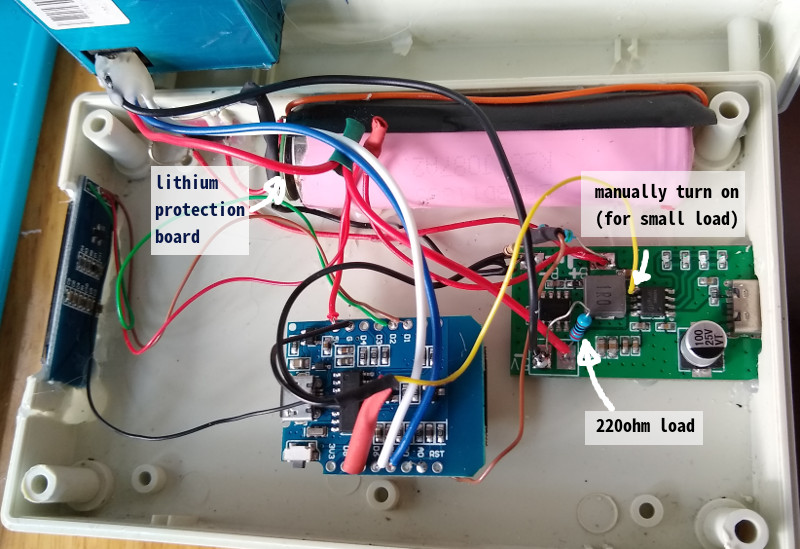
Wiring and enclosure
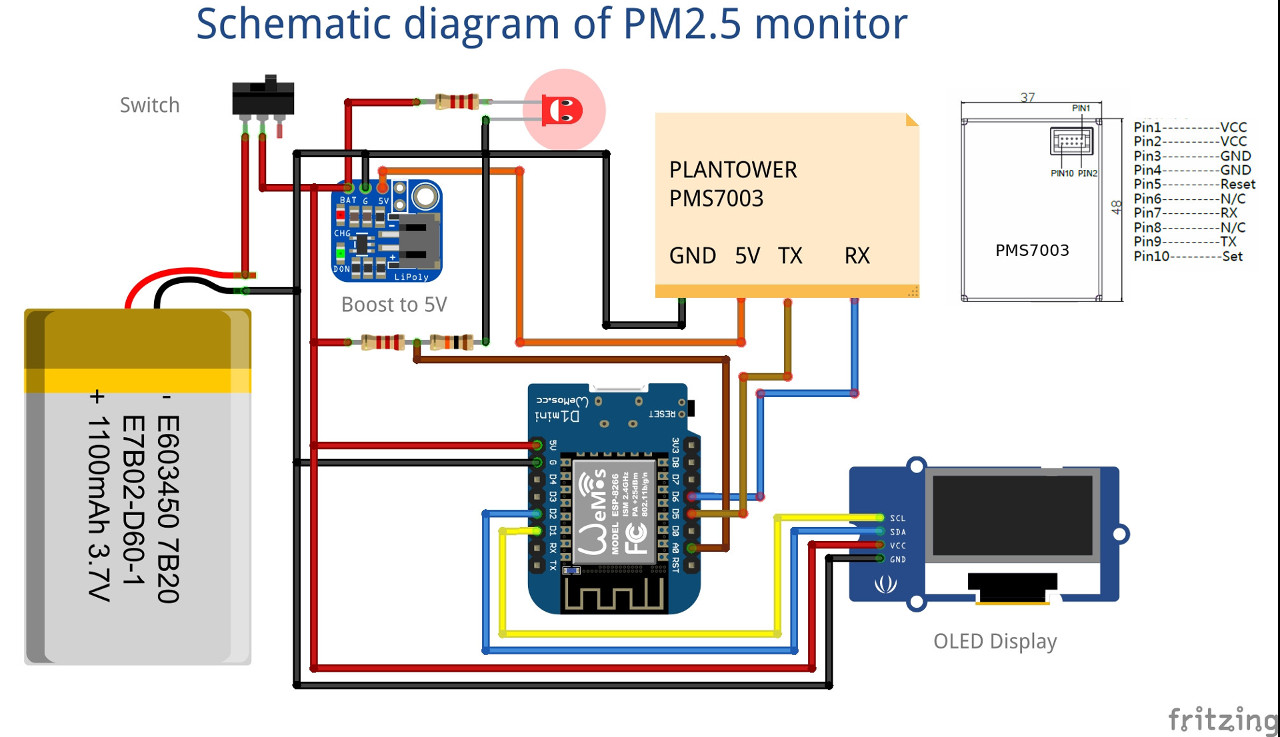
The archived build uses a WeMos/ESP8266 with PMS7003, OLED, Li-ion power, and an IP5306-based boost board. One practical complication: the boost converter needed enough load to stay awake, so a dummy load resistor and a control wire from the microcontroller were used.
Firmware structure
The original firmware depends on:
pmsx003for PMS7003 data parsingesp8266-oled-ssd1306for the displayNTPClientandWiFiUdpif you want real time from NTP
Core include block from the archived guide:
#include <Wire.h>
#include <ESP8266WiFi.h>
#include <NTPClient.h>
#include <WiFiUdp.h>
#include <pms.h>
#include "SSD1306.h"
The tutorial uses a simple fallback strategy: if Wi-Fi/NTP fails after several retries, the device still continues as a local PM monitor without time sync.
Sampling is interval-based rather than continuous:
void loop() {
  uptime = round(millis()/1000L);
  if ((uptime - lastSampling) > INVL) {
    printLocalTime();
    read_pms();
    read_bat();
    display_main();
  }
  delay(1000);
}
Original code repository:
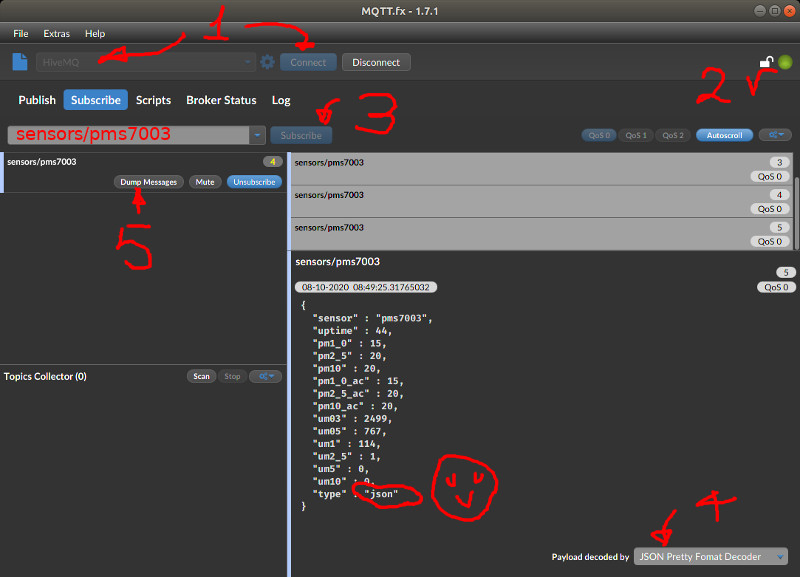
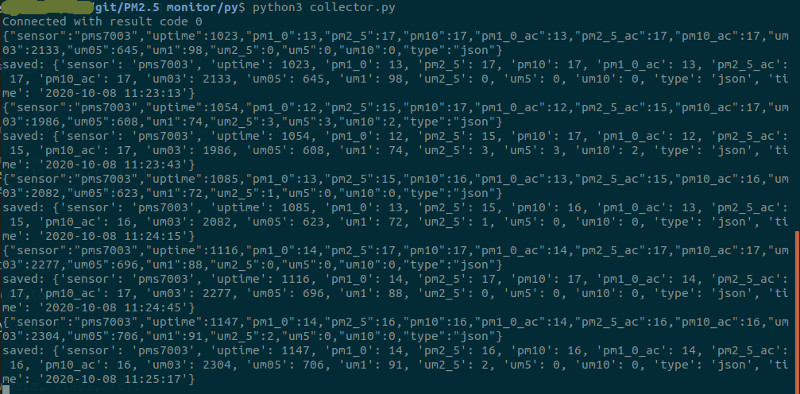
MQTT logging extension
The fourth and fifth pages of the original guide extend the handheld device into a connected logger. The suggested path is:
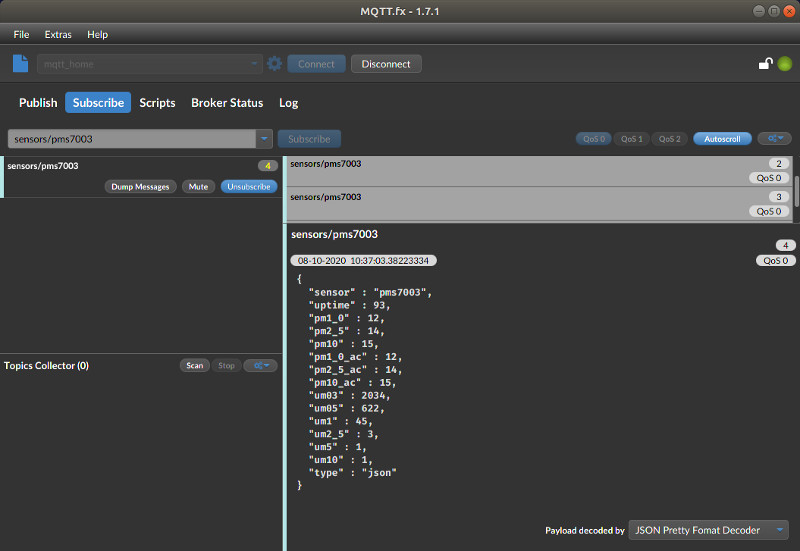
- read all PMS7003 values
- pack them into JSON
- publish to an MQTT broker
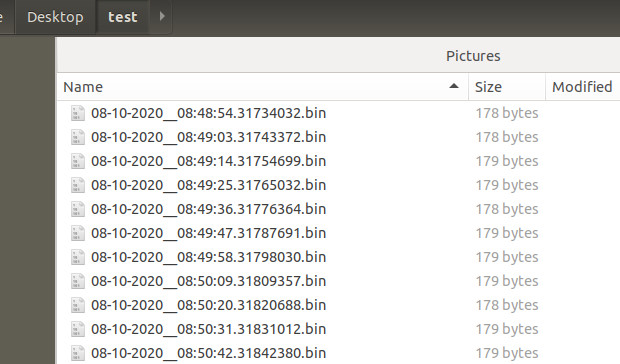
- capture the stream with a desktop client or Python script
Relevant libraries:
#include <PubSubClient.h>
#include <ArduinoJson.h>
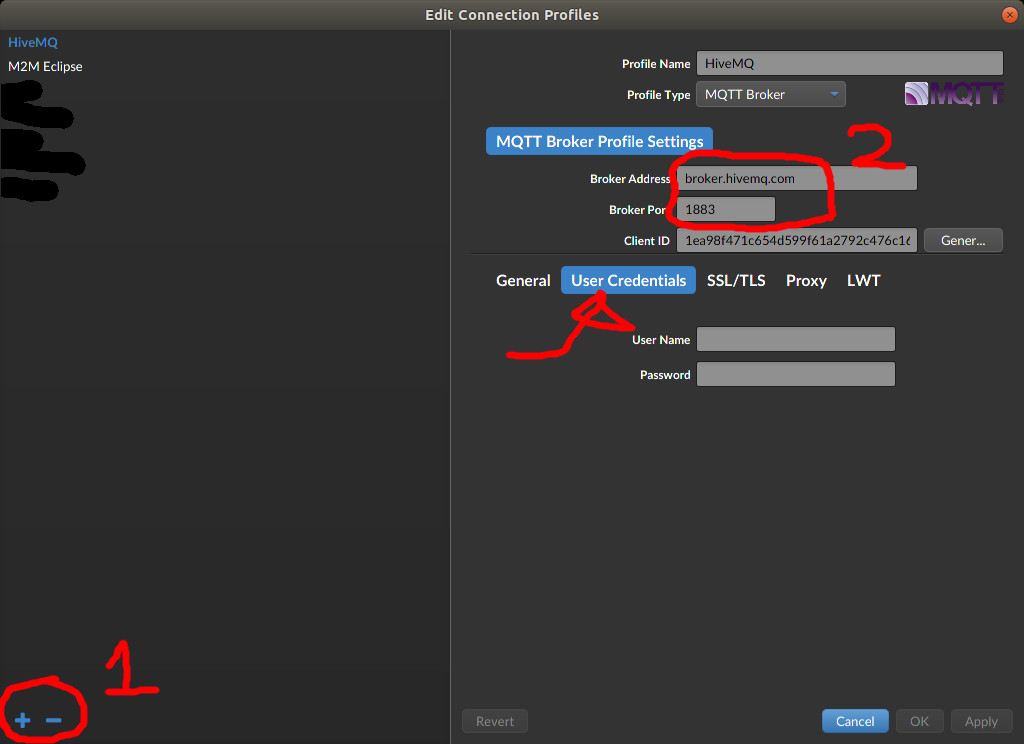
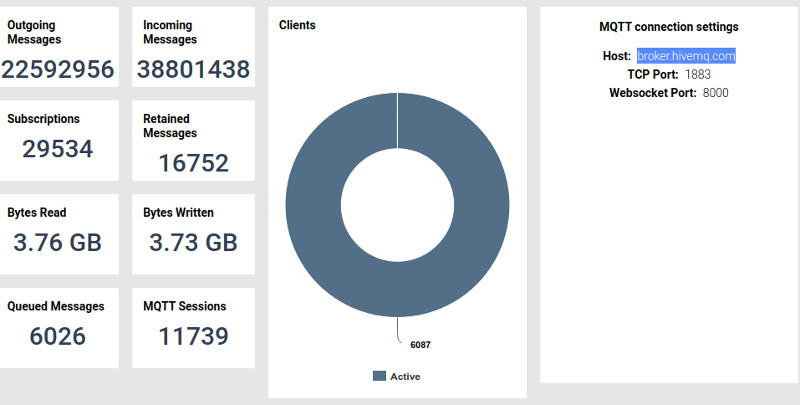
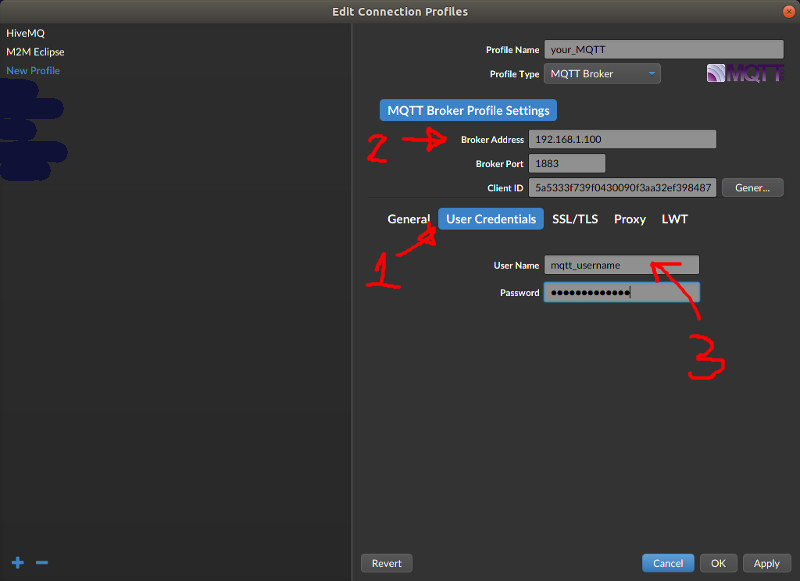
The archived guide uses a public HiveMQ broker for experimentation and later recommends moving to a private MQTT server with authentication for real use.
Example topic setup from the original:
#define SENSORNAME "pms7003"
#define mqtt_server "broker.hivemq.com"
#define publish_topic "sensors/pms7003"
#define subcribe_set "sensors/pms7003/set"
Setup screenshots
For a private setup, the original tutorial also points to:
- an ESP8266 sketch with authentication
- a Python collector script in the
pyfolder of the same repo
Additional screenshots:
Practical takeaways
- PMS7003 or SDS011 is a reasonable starting point for a personal PM monitor
- local display first, MQTT second is the right order of complexity
- JSON payloads are much easier to manage than ad hoc comma-separated strings when you publish many fields
- public MQTT brokers are fine for testing, but private brokers are better for long-term logging
Related pages
Original Reference
First published on Instructables: